Transformation tool specification
Contents
intro
This is the specification for the unified transformation tool.
This tool has been designed to achieve some very specific goals:
- it is a tool for users who know what they are doing, at a pace of around two actions per second; this tool stays out of their way and does not make them think;
- it is a tool to work on pixels creatively, more by feeling than by numbers; this gives us the confidence to ban working with numbers for transformations where this can be useful—scale, move, rotate—to other tools or menu commands;
- combining both points above, we try to enable a positive feedback loop where the result of the last transformation input inspires the next few steps;
- it is a tool to supersede the move, scale and shear tools, in a drive to slim down the toolbox; this means that simple things need to remain simple;
- it is a tool that provides a more freewheeling alternative to the rotate and perspective tools; as a follow-up to this design the rotate and perspective need a serious refresh—to for instance support getting horizons really horizontal and verticals really vertical for photographers.
on units, sizes and visible
All sizes in this spec are in on-screen pixels. This means that the zoom level has an influence on everything. A 30x20 in-image rectangle can be displayed on screen as 300x200, and vice versa.
Also the panning of the image has an influence on everything. Only the visible part of the transform frame goes into the size calculations.
decision time
The right moment to recalculate the transform frame shall be after—through zooming, panning or actual transformation change—the on-screen pixel size of the transform frame has changed. It is explicitly not desirable to do this during zooming, panning or actual transformation changes.
doing the work
In the interest of both GIMP and users, the transformation tool shall be very lazy about doing real calculations on image pixels. This actual calculation shall only be performed when users go and do something else: e.g. select another tool, switch layer, invoke a plugin, save the file, etc. This is also a contract with users that maximum fidelity is assured by conceptually taking the pixels as they were when the transformation tool was selected and transforming only once with an aggregate transformation—which shall combine every single step thet users did after entering the tool.
undo
Before the final pixel recalculation is done, every single step thet users did after entering the tool shall be able to be undone. After the final pixel recalculation is done only the aggregate transformation shall be able to be undone.
pixels, selections, paths and guides
The first thing we have to do is to untangle the mess of the different modes—layer, selection, paths—as used in the 2.6 transform tools. We do that with the following strategy:
- selections are transformed in any selection tool;
- paths are transformed in the path tool;
- pixels are transformed in the transform tool;
- guides are moved with the transform tool.
intermezzo: tool icon
the tool icon for the transform tool shall be the ‘mouse arrow‘—example: ![]() . This enables the tool to be instantly recognised for moving and scaling pixels, and for moving guides.
. This enables the tool to be instantly recognised for moving and scaling pixels, and for moving guides.
transforming selections
In any selection tool, in ‘marching -ants state’ (nothing hairy happening), either the pending selection or else (each, in a multi-selection future) committed selection shall have a transform icon—![]() , 32 pix diameter, 25% opacity—associated with it on-canvas. Clicking it shall invoke the transform mode:
, 32 pix diameter, 25% opacity—associated with it on-canvas. Clicking it shall invoke the transform mode:
- the transform icon shall change into a similarly styled icon representing the current selection tool; clicking it shall commit the transformation (if any) and return to the state the selection tool was in just before invoking the transform mode;
- only the marching-ants outline of this (pending) selection shall remain and the smallest initial transform frame that can contain this outline shall be overlaid;
- the selection tool shall remain the official active tool in the toolbox, but the tool options shall be swapped out for the ones of the transform tool;
- the transform tool shall operate on the marching ants outline.
Invoking and ending the transform mode needs a cool key short-cut, similar to the spacebar trick. <alt> is a possibility, I am open to suggestions.
transforming paths
This shall work fully analogue to transforming selections. When not in building-paths mode, each path shall have the same transform icon associated with it on-canvas. Clicking it shall invoke the transform mode:
- the transform icon shall change into a similarly styled icon representing the path tool; clicking it shall commit the transformation (if any) and return to the state the path tool was in just before invoking the transform mode;
- the smallest initial transform frame that can contain this path shall be overlaid;
- the path tool shall remain the official active tool in the toolbox, but the tool options shall be swapped out for the ones of the transform tool;
- the transform tool shall operate on the path.
Same deal here with the key short-cut. I am open to suggestions.
moving guides
Moving existing guides shall ‘just work’: hover the mouse sprite close enough to a guide; the guide highlights; grab it, move it, drop it. If the current way for this does not work well enough, then this needs improving, not the introduction of settings or modes.
on-canvas interaction
The action is on-canvas. A frame of handles is used to perform all transform actions: move, rotate, scale, shear and perspective.
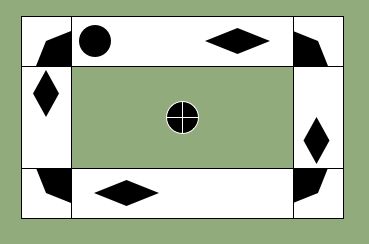
Here is the frame in its initial—rectangular—form:
for clarity the frame is shown here at full opacity and against a green background
- transparent centre area is the move handle
- the four white-background corners are the scale handles
- the four white-background area between the scale handles are the side handles, also used for scaling
- the top black-background circle is the rotation handle
- the four black-background diamonds are the shear handles
- the four black-background corners are the perspective handles
- the centre black-background circle is the pivot, used to rotate around, and can be used to scale and shear from
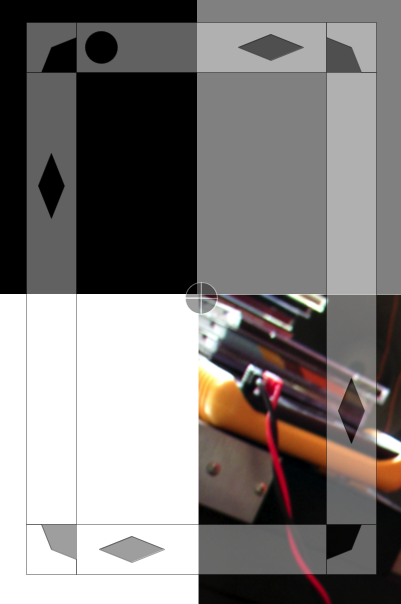
Al these handles/areas shall be drawn using pure black or white colours. All shall be shown on the canvas at 25% opacity, except for the move handles which shall be transparent. That this works in any situation we can see here against the 3 acid-test backgrounds, and something colourful:
As can be seen here, only where necessary the areas shall be delineated by a 1 pixel border in contrasting colour.
shaping up
Although its default shape when invoking the transform tool—or mode—shall be rectangular at zero degrees angle with the canvas, in practice the transform frame will not remain this orderly for long. In general four corner points will be connected to each other by four sides and this spans up the transform frame.
Because of rotation, the notion of width and height becomes rather arbitrary for the transform frame:
- the minimum and maximum width of the transform frame shall be defined as the minimum and maximum distance between the two sides that started off as vertical in the initial frame.
- the minimum and maximum height of the transform frame shall be defined as the minimum and maximum distance between the two sides that started off as horizontal in the initial frame.
- the centre of the transform frame shall be defined as the point where the two diagonals through the corner points cross.
While calculating the sizes of the frame, we will assume that the transform will be performed at a magnification where users can actually see what they are doing. This means there is not requirement to implement a narrow situation.
Conceptually, the transform frame is set up as follows:
- connect the four corner points by the four sides;
- set up the inner lines that built the side handles and scale handles together with the sides:
- the inner lines shall run parallel to the sides;
- the distance between the inner lines and the sides for both ‘horizontal sides’ shall be the same; it shall be the minimum height / 4, CLAMPed by 50 at the top end;
- the distance between the inner lines and the sides for both ‘vertical sides’ shall be the same; it shall be the minimum width / 4, CLAMPed by 50 at the top end;
- these distances between the inner lines and the sides shall be called the side handle widths; we can see that all the corner areas are parallelograms.
- set up the perspective handles inside the corner areas:
- TBD;
- set up the shear handles:
- TBD
- place rotation handle:
- the radius of the circle shall be MIN(of both side handle widths) / 3, always rounded down; this results in an area of close to a third of that of a corner area;
- the shall be placed on a side handle, close to—and on the clockwise side—of a corner area; it shall be placed centred on the side handle width, at a distance of half its radius from the corner area;
- the default position of the rotation handle shall be next to the corner area that starts out at the top-left of the initial transform frame; however, the rotation handle shall always be in view, if it is not for the default position, then is shall be positioned next to the first corner area in clockwise direction which will make it visible in the current viewport.
- place the pivot:
- the radius of the shall be that of the rotation handle;
- the centre this circle shall be placed at the pivot position;
- the default position of the pivot shall be the centre of the transform frame.
transformation constraints
Because the handles on the transform frame work 100% in parallel, transformation constraints can be overloaded, and the modifier keys to toggle them can be overloaded as well. There shall be the following transformation constraints:
- constrain
- works on move, rotate and perspective, toggled by <shift>
- keep aspect
- works on scale, toggled by <shift>
- from pivot
- works on scale and shear, toggled by <ctrl>
- free shear
- works on shear, toggled by <shift>
- centre/corner pivot
- works on pivot, toggled by <shift>
the scale constraints—keep aspect and from pivot—modifier keys have been aligned with the selection tools and the rest of the world.
action!
The transformation tool shall perform the following actions:
move
Moving means translating all four corner points, with all four corner points at constant distance and all sides at constant angles.
- dragging the move handle shall translate all four corner points by the vector of the drag;
- when the constrain transformation constraint is enabled, the translation shall only be along vectors that are at angles that are multiples of 45 degrees with the canvas.
rotate
Rotating means changing the angle of all four side angles around the pivot, with all four corner points at constant distance.
- while dragging the rotation handle it shall be kept at fixed distance to the pivot;
- dragging the rotation handle shall change all four side angles by the rotation of the drag, keeping the pivot at the same coordinate on the canvas;
- when the constrain transformation constraint is enabled, the rotation shall only be at angles that are multiples of 15 degrees with the canvas.
scale
Scaling through scale handles means translating one corner point, with the two nearest-neighbour corner points translating to keep all sides at constant angles.
- dragging a scale handle shall translate its corner point by the vector of the drag;
- when the keep aspect transformation constraint is enabled, the translation shall only be along the diagonal that runs trough this corner point;
- when the from pivot transformation constraint is enabled, the pivot point shall remain at the same coordinate on the canvas, by also translating the diagonally-opposite corner point.
Scaling through side handles means translating one side, with it and the opposite side at constant angles.
- dragging a side handle shall translate its side by the vector of the drag, along the vector that runs thorough the midpoint of this side and that of the opposite side;
- when the keep aspect transformation constraint is enabled, all four corners shall translate to keep all sides at constant angles;
- when the from pivot transformation constraint is enabled, the pivot point shall remain at the same coordinate on the canvas, by also translating the opposite side.
shear
Shearing means translating one side, with it and the opposite side at constant angles.
- dragging a shear handle shall translate its side by the vector of the drag, along the angle of the side;
- when the free shear transformation constraint is enabled, the side shall translate freely by the vector of the drag;
- when the from pivot transformation constraint is enabled, the pivot point shall remain at the same coordinate on the canvas, by also translating the opposite side.
perspective
Perspective transform means means translating one corner point, with the other 3 corner points at constant coordinates.
- dragging a perspective handle shall translate its corner points by the vector of the drag;
- when the constrain transformation constraint is enabled, the translation shall only be either along the side angles of the two sides that run to this corner point, or along the diagonal that runs trough this corner point.
pivot
- dragging the pivot shall translate it by the vector of the drag;
- when the centre/corner pivot transformation constraint is enabled, the pivot shall snap to either the four corner points, or the centre of the transform frame;
- the pivot shall track the ‘pixel’ it is placed upon under any transformation.
feedback
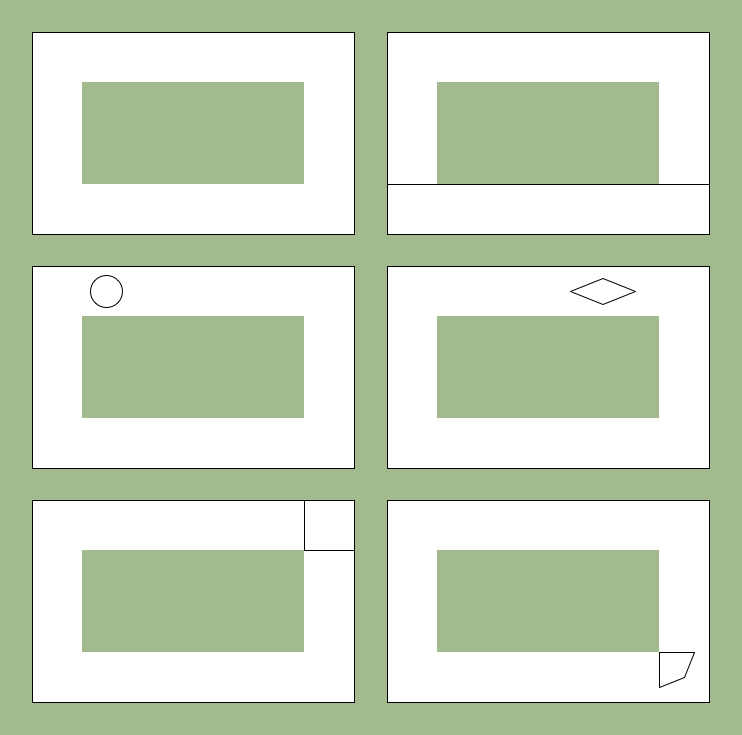
As soon as the mouse goes down and a transform is started, a minimal transform frame shall be displayed, with the outline of the handle that is being manipulated; the frame shall fluidly track the mouse input and press/release of modifier keys:
for clarity the frames are shown here at full opacity and against a green background
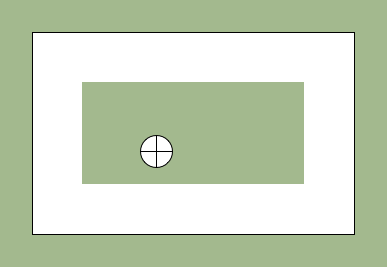
As soon as the mouse goes down and a move of the pivot is started, a minimal transform frame shall be displayed, with the outline of the pivot; the pivot shall fluidly track the mouse input and press/release of modifier keys:
for clarity the frame is shown here at full opacity and against a green background
Al these handles/areas shall be drawn using pure black or white colours. All shall be shown on the canvas at 25% opacity, except for the move handles which shall be transparent.
tool options
The tool options shall be structured as follows:
First what shall not be in the tool options. Be aware that ‘kitchen sink’ requests (put all the features of all the transform tools in the world into this one) cannot be met. Also this tool does not live in a vacuum, it will coexist with the rotation tool, the perspective tool and further menu commands that do transformations. This means that this tool can focus on what it is designed for, without having to cover ‘everything.’
There shall be no input for exact numbers for transformations this is a) against the spirit of the tool and b) quickly gets meaningless because of the combined and random-order nature of the transforms. Both precision and number-punching user needs are covered by the rotation tool, the perspective tool and menu commands like Layer->Transform->Offset and Layer->Scale layer.
There shall be no ‘grid of lines’ in this tool, it is against the spirit of the tool. These user needs are covered by the rotation tool and the perspective tool.
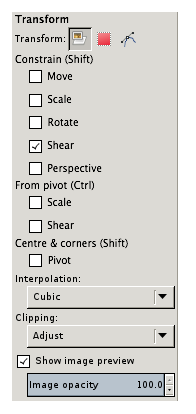
Unchanged are the layer/selection/path toggle-buttons, the interpolation, clipping and preview options. Preview shall be true by default.
There shall be 8 new checkboxes to set and communicate the constraints and their modifier keys. Although controlled by only two modifier keys, the parallel nature of this tool makes individual constraints settings useful. ‘Keep aspect’ and ‘free shear’ have been integrated under the general ‘constrain’ heading. Constrain shear == false shall mean free shear == true. Constrain shear shall be true by default, to make shearing work as expected out of the box.
