Difference between revisions of "Usability and Colors"
(→New Concept to Scrolling the Swatches) |
|||
| (25 intermediate revisions by the same user not shown) | |||
| Line 1: | Line 1: | ||
| + | <div style="width:60em;"> | ||
==FG Invert Color== | ==FG Invert Color== | ||
| − | In the painting tasks, | + | In the painting tasks, is very important to work with different methods to select or to choose colors. The complementary colours are commonly utilized by all artists. |
===Improvements reasons=== | ===Improvements reasons=== | ||
| − | To invert a | + | To invert a colour is necessary for many steps between pick and wheel colour dialogues. With a shortcut these actions are more immediate and, the painting session has fewer actions and steps with different colour dialogues. |
===Invert color of FG=== | ===Invert color of FG=== | ||
| − | Add a toggle shortcut to invert the current | + | Add a toggle shortcut to invert the current colour on FG. |
===References=== | ===References=== | ||
| − | [http://www.ddoreau.com/non-dairy-diary/2016/5/13/a-modern-approach-to-complementaries A modern approach to complementary | + | [http://www.ddoreau.com/non-dairy-diary/2016/5/13/a-modern-approach-to-complementaries A modern approach to complementary colours] |
==Color Swapping== | ==Color Swapping== | ||
| Line 22: | Line 23: | ||
'''Comments [Massimo Valentini]'''<br> | '''Comments [Massimo Valentini]'''<br> | ||
| − | <pre | + | <pre>I experimented a bit with these actions and I have found that they only work if the 'Palette Editor' is docked or at least open. So one has to open Windows->Dockable Dialogs->Palettes and double click on a palette, this way the 'Palette Editor' is opened and after that, these shortcuts start working. They keep working even if the dockable is not the active tab.</pre> |
[[Image:change-foreground-color-dialog-shortcuts.jpg|thumb|none|left|900px|Configuring the current keyboard shortcut scrolling the swatches in a palette (thanks to Massimo Valentini).]]<br> | [[Image:change-foreground-color-dialog-shortcuts.jpg|thumb|none|left|900px|Configuring the current keyboard shortcut scrolling the swatches in a palette (thanks to Massimo Valentini).]]<br> | ||
| − | ==== | + | ====Swatch History Colours==== |
| − | The | + | The history of the colours used by the user appears on two different dialogues: '''FG/BG Color'''(Dockable) and '''Change Foreground/Background Colour''' (a floating dialogue that is shown when clicking on FG/BG on Toolbox. |
| − | The swatches (two rows) could be understood as a palette built, on on-the-fly on the '''Change Foreground/Background Colour''' dialogue, during the work sessions by the user in three ways: | + | The swatches (two rows) could be understood as a palette built, on on-the-fly on the '''Change Foreground/Background Colour''' dialogue, during the work sessions by the user in three ways:</p> |
| − | * via the button ''''>'''' to add the current colour on FG to the palette or; | + | * [1] via the button ''''>'''' to add the current colour on FG to the palette or; |
| − | * via drag and drop colour in each swatch or; | + | * [2] via drag and drop colour in each swatch or; |
| − | * | + | * [3] via picker colour, but is added only after the colour is used on canvas. Each new colour is always placed in the first slot (left side of the first row), and the displacement of colours happening versus the right-side direction to each new colour added. |
| + | I dockable the History Palette to assign shortcuts to scroll the colours, making it possible to interact with the history.<br> | ||
| + | But, always is linked with the History Palette, for example, if you change the palette the History Palette will not be active and the shortcuts will be working on the active palette.<br> | ||
| + | The two rows of swatches are a mix of different palette colours but is not possible to interact via shortcut with them. An interesting thing is that these swatches are always present with different palettes... in theory, this resource is what we need... ''but at the moment only via the click of the mouse.'' | ||
[[Image:gimp-picker-history-colours.png|thumb|none|400px|History Colors in the FG/BG Colours.]] | [[Image:gimp-picker-history-colours.png|thumb|none|400px|History Colors in the FG/BG Colours.]] | ||
[[Image:change-foreground-color-dialog.jpg|thumb|none|400px|Change Foreground Color Dialogs.]] | [[Image:change-foreground-color-dialog.jpg|thumb|none|400px|Change Foreground Color Dialogs.]] | ||
| − | ===Scrolling the Swatches | + | ===New Action to Scrolling the Swatches=== |
Create an action of the history colours independently, or rather, is not necessary to have opened or tabbed the palette editor. | Create an action of the history colours independently, or rather, is not necessary to have opened or tabbed the palette editor. | ||
| Line 45: | Line 49: | ||
# Swapping colour without the necessity to use the traditional dialogues... the session task is more focused and simple. | # Swapping colour without the necessity to use the traditional dialogues... the session task is more focused and simple. | ||
| − | ====Scenario | + | ====Scenario of the Single Window Mode==== |
| − | + | I analysed the steps in the Multiple Window Mode, but in Single Window Mode, the default of GIMP, it is the same thing, because we need to move the cursor around the window/docks and make clicks to select colours in the different dialogues. | |
====Fill a Mondrian Grid==== | ====Fill a Mondrian Grid==== | ||
| Line 64: | Line 68: | ||
The sample has 6*6=36 rectangles, only to select colours for all rectangles, we must cross or move the cursor and do clicks at an amount of a minimal 72 and a maximum of 108 times. | The sample has 6*6=36 rectangles, only to select colours for all rectangles, we must cross or move the cursor and do clicks at an amount of a minimal 72 and a maximum of 108 times. | ||
| − | == | + | ==Colour Wheels Kind== |
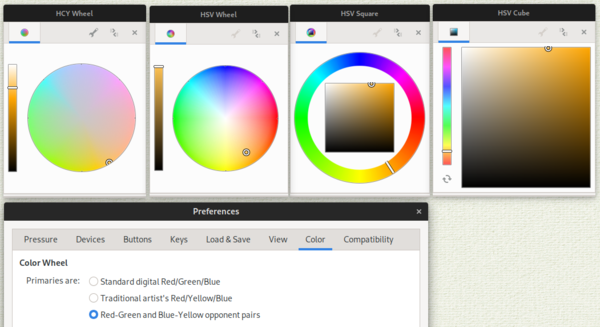
| − | + | Some of the advanced Painting software, in free software, as such Krita and MyPaint have more than one possibility to choose the Colour Wheel kind [Digital Painting Colour Wheel [https://en.wikipedia.org/wiki/Color_wheel Wikipedia]]. | |
| − | + | [[File:mypaint-colour-wheels-and-preferences.png|thumb|none|900px|The Wheel Colours and preferences of MyPaint.]] | |
| − | + | ===Why Reasons=== | |
| − | + | The digital [http://www.ddoreau.com/non-dairy-diary/2016/5/13/a-modern-approach-to-complementaries RGB approach is not a unique way to work with the colours]. The possibility of having other schemas helps with usage and also the comprehension of how the colour schemas work.' | |
| − | + | Normally the traditional artists are habituated to using RYB and/or [https://en.wikipedia.org/wiki/Color_wheel#Opponent_process_model Red-Green/Blue-Yellow Opponent Pairs]. | |
| − | |||
| − | |||
| − | |||
| − | |||
| − | |||
| − | |||
| − | + | The typologies of dispositions on the Colours Wheels are mainly: | |
| − | |||
| − | |||
| − | |||
| − | |||
| − | ' | + | # Standard Digital Red/Green/Blue [[File:RGB_Color_Wheel.png|thumb|none|400px|RGB Colour Wheel]] |
| + | # Traditional artist's Red/Yellow/Blue [[File:RYB_Colour_Wheel.png|thumb|none|400px|RYB Colour Wheel]] | ||
| + | # [https://en.wikipedia.org/wiki/Color_wheel#Opponent_process_model Red-Green and Blue-Yellow] opponent pairs [[File:Red-Green_Blue-Yellow.png|thumb|none|600px|Red-Green and Blue-Yellow Opponent Pairs]] | ||
| − | == | + | ==Color Paint Dynamics on Clone Tool== |
| − | + | [[File:Impasto-with-clone-tool+pattern-clipboard-sample-cloud.jpg|thumb|none|900px|Example of impasto using the Clone Tool with a swatch of a clipboard pattern.]] | |
| + | |||
| + | I have noticed that is possible to use RGB brushes with the Color paint dynamics parameter and solve the issue of colourizing also them. I have tested if is possible to use the Color (paint dynamics parameter) with the Clone Tool. All parameters of dynamics are linked except the Color. | ||
| + | So, If I think that is possible to use an RGB brush with the Color Paint Dynamics parameter I think is possible to enable also this possibility to Clone Tool. | ||
| + | |||
| + | ===Reasons of the Improvement=== | ||
| + | With Clone Tool is possible to emulate with exceptional results the impasto and oil textures without additional resources or engines. This method is not ready-to-use but it needs some tutorials and videos to show how to use this emerging feature. The profile of this feature is indicated to high-end users and painters that are interested to use GIMP to improve their style. | ||
| + | |||
| + | The Clone Tool is very versatile and can be used easily to resolve many issues of the impasto effectively… convinces the viewer how the impasto, not only by an engine but also from the usage of this feature creatively and differently of other similar apps. | ||
| + | I have commented, in past, on this point with many of my friends, Gustavo Deveze, Mozart Couto and Vasco Alexander. Vasco sent me interesting notes about this, which I have copied below as an excerpt: | ||
| + | |||
| + | <blockquote style="font-style: oblique;">Next, I will write down my thoughts on impasto and the simulation of real tools in digital painting. First of all, your work is of the highest quality of what I have seen so far in this field. I can't say much about the technical approach, but I think it might be of interest to discuss reasons why especially impasto is important to improve the quality of digital painting tools. | ||
| + | Two physical aspects of (traditional) impasto came to my mind. First, it is a bridge connecting an illusory space with the real world and second, it adds real value (thick oil paint is expensive). The second aspect might be outdated, but I believe that there is still some truth in it. Additionally, there is an artistic aspect in showing the work/process of the artist through visible strokes. This might help to convince the viewer of the artistic virtuosity and the ability of abstraction. [I explicitly think of impasto here and not of creating visual meanings/textures with flat strokes] | ||
| + | When it comes to digital art we are facing the problems of virtuality and originality. We might not be able to solve these problems, but we might be able to create an illusion to convince our audience. Impasto is a great way to do this. To build a bridge to the real world and take a step away from the virtual aspect. It simply helps to sell our work to the viewer as something that is man-made, unique and original. This becomes even more evident if we think of highly abstract art. Of course, there are other reasons why we need to improve digital tools e.g. stylization, reproduction of traditional work etc.</blockquote> | ||
| + | |||
| + | With Deveze, I have made some tests with the Clone Tool and is possible to use this tool to resolve many issues about impasto and to mix partially the strokes (smudge via Color parameter on Paint Dynamics), but is not possible to use the Color parameter, that is main subject of this topic. | ||
| + | |||
| + | To emulate impasto with GIMP we can use practically all instances of 'Source' [image, pattern (clipboard or specific pattern)] and different options of 'Alignment', with a great variety of the resulting and possibilities and is very creative the process (this is a stuff for a tool presets collection and here is not place to discuss this point). | ||
| + | So the possibilities of this usage are enormous… because we have: | ||
| + | |||
| + | {Brush (library, clipboard) + Tool Options + Paint Dynamics + Source [image, Pattern (library, clipboard)] + Alignment types (None, Aligned, Registered, Fixed)} | ||
| + | |||
| + | Only to demonstrate a bit more, for instance, the clipboard feature used many times, to select/copy different parts of an image or swatches or patterns pre-built for this scope is possible to produce something as we see in the figure at the top of this document. | ||
| + | |||
| + | So, is possible to use this method… with personal 'pattern swatches' to have variations and other colours, as a kind of customized palette, to emulate different effects and colours. | ||
| + | [[File:Brown-city-impasto.jpg|thumb|none|900px|A simple exercise to experiment the current impasto skills of Clone Tool.]] | ||
| + | |||
| + | </div> | ||
Latest revision as of 14:25, 1 March 2024
Contents
FG Invert Color
In the painting tasks, is very important to work with different methods to select or to choose colors. The complementary colours are commonly utilized by all artists.
Improvements reasons
To invert a colour is necessary for many steps between pick and wheel colour dialogues. With a shortcut these actions are more immediate and, the painting session has fewer actions and steps with different colour dialogues.
Invert color of FG
Add a toggle shortcut to invert the current colour on FG.
References
A modern approach to complementary colours
Color Swapping
Main Scope is to have a swap a "fixed number" of colours used in each session, via a toggle shortcut key.
Current possibilities
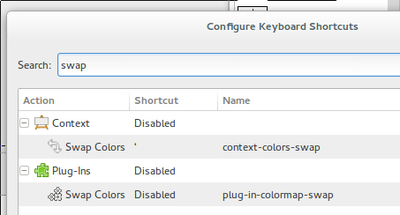
Swap FG/BG Shortcut
Swap between FG/BG Color via keyboard shortcut → screenshot Configure Keyboard Shortcuts.
Scrolling Swatches Current Palette
Scrolling between the swatches of the current palette via Keyboard Shortcuts:
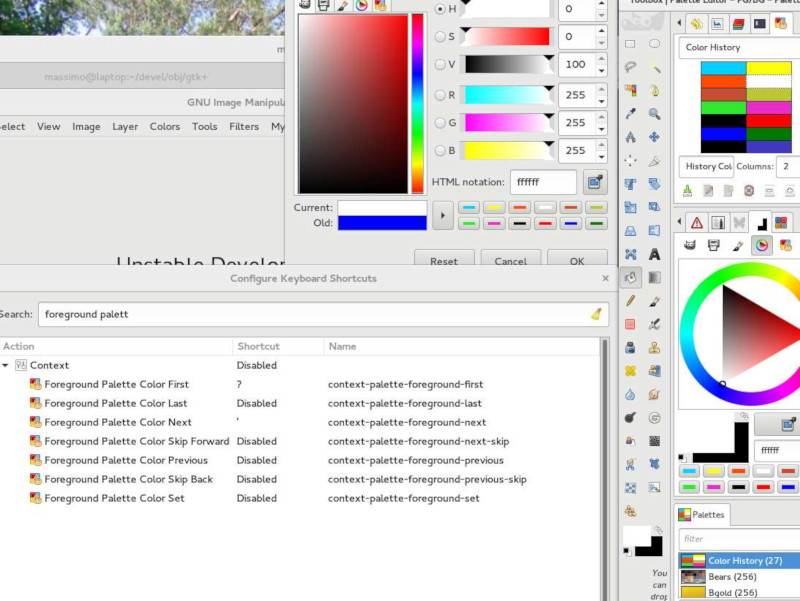
The 'context-foreground-palette-...' and 'context-background-palette-...' to scroll the all swatches of a palette.
But to use these shortcuts is necessary to have the Palette Swatches and the Palette Editor opened or dockable.
For more details see the report on Bugzilla about these shortcuts → Context actions on Palette dialogues.
Comments [Massimo Valentini]
I experimented a bit with these actions and I have found that they only work if the 'Palette Editor' is docked or at least open. So one has to open Windows->Dockable Dialogs->Palettes and double click on a palette, this way the 'Palette Editor' is opened and after that, these shortcuts start working. They keep working even if the dockable is not the active tab.
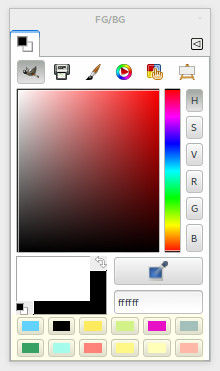
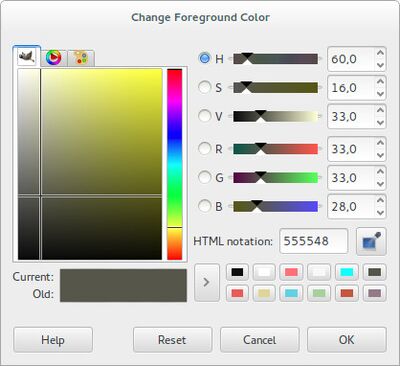
Swatch History Colours
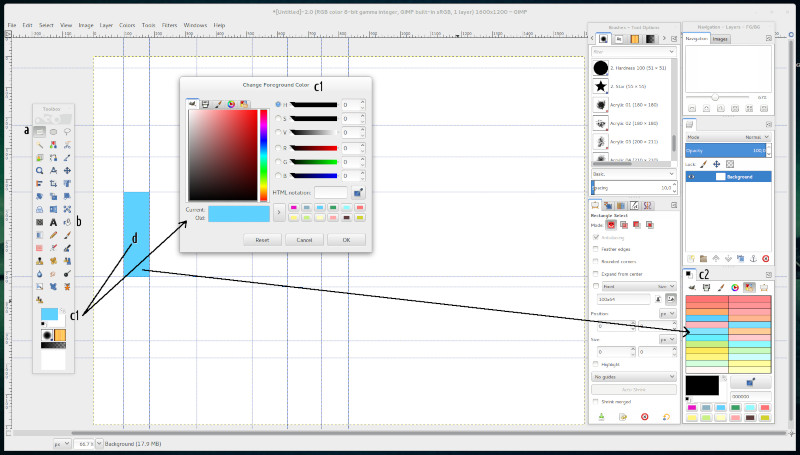
The history of the colours used by the user appears on two different dialogues: FG/BG Color(Dockable) and Change Foreground/Background Colour (a floating dialogue that is shown when clicking on FG/BG on Toolbox. The swatches (two rows) could be understood as a palette built, on on-the-fly on the Change Foreground/Background Colour dialogue, during the work sessions by the user in three ways:</p>
- [1] via the button '>' to add the current colour on FG to the palette or;
- [2] via drag and drop colour in each swatch or;
- [3] via picker colour, but is added only after the colour is used on canvas. Each new colour is always placed in the first slot (left side of the first row), and the displacement of colours happening versus the right-side direction to each new colour added.
I dockable the History Palette to assign shortcuts to scroll the colours, making it possible to interact with the history.
But, always is linked with the History Palette, for example, if you change the palette the History Palette will not be active and the shortcuts will be working on the active palette.
The two rows of swatches are a mix of different palette colours but is not possible to interact via shortcut with them. An interesting thing is that these swatches are always present with different palettes... in theory, this resource is what we need... but at the moment only via the click of the mouse.
New Action to Scrolling the Swatches
Create an action of the history colours independently, or rather, is not necessary to have opened or tabbed the palette editor.
Improvement Reasons
Enhancing the General Usability:
- To have a fast way to access the history colours used in each work session;
- To avoid excessive use of steps, via mouse mainly, between paint tools tasks (repetitive stress), see test below;
- Swapping colour without the necessity to use the traditional dialogues... the session task is more focused and simple.
Scenario of the Single Window Mode
I analysed the steps in the Multiple Window Mode, but in Single Window Mode, the default of GIMP, it is the same thing, because we need to move the cursor around the window/docks and make clicks to select colours in the different dialogues.
Fill a Mondrian Grid
I imagined a case of colouring multiple areas to have an idea of the amount the clicks and movements along the screen to finish this work.
Steps to fill the grid
- Rectangle Tool Selection → select a rectangle;
- Bucket fill tool;
- Choose colour;
- Click on FG Color on Toolbox → Open Change Foreground Color → Move cursor on Dialog → Choice steps (minimal 1 step, 2 steps if need to close dialogue);
- Move cursor until FG/BG Color Dialog → Choice steps (2 steps);
- Move cursor until FG/BG Color Dialog → Choice steps (2 steps);
- Fill the selected rectangle.
To choose colours is necessary a minimum of 2 steps and a maximum of 3 steps (cursor movements and clicks).
The sample has 6*6=36 rectangles, only to select colours for all rectangles, we must cross or move the cursor and do clicks at an amount of a minimal 72 and a maximum of 108 times.
Colour Wheels Kind
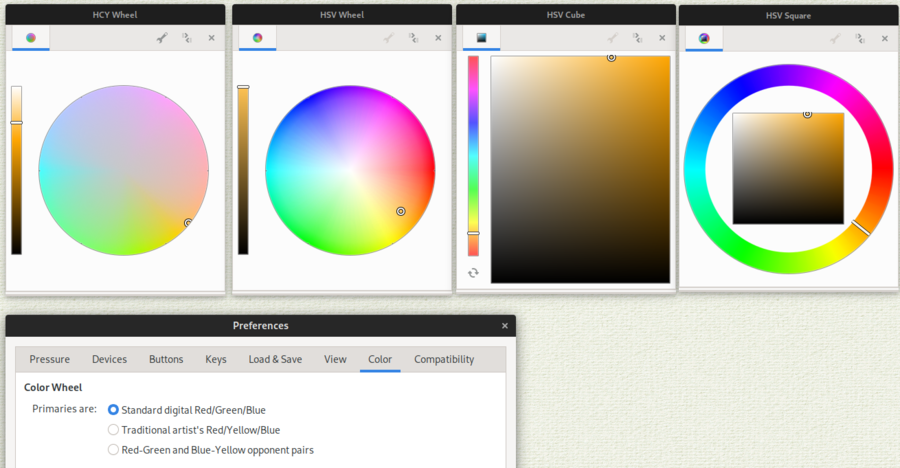
Some of the advanced Painting software, in free software, as such Krita and MyPaint have more than one possibility to choose the Colour Wheel kind [Digital Painting Colour Wheel Wikipedia].
Why Reasons
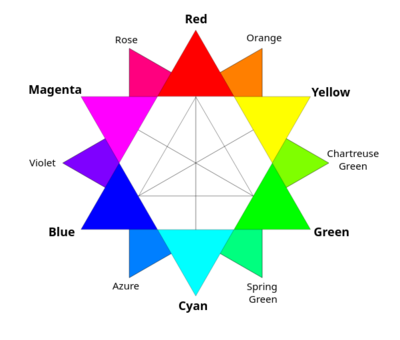
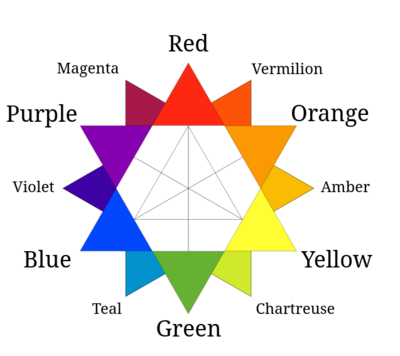
The digital RGB approach is not a unique way to work with the colours. The possibility of having other schemas helps with usage and also the comprehension of how the colour schemas work.' Normally the traditional artists are habituated to using RYB and/or Red-Green/Blue-Yellow Opponent Pairs.
The typologies of dispositions on the Colours Wheels are mainly:
- Standard Digital Red/Green/Blue
- Traditional artist's Red/Yellow/Blue
- Red-Green and Blue-Yellow opponent pairs
Color Paint Dynamics on Clone Tool
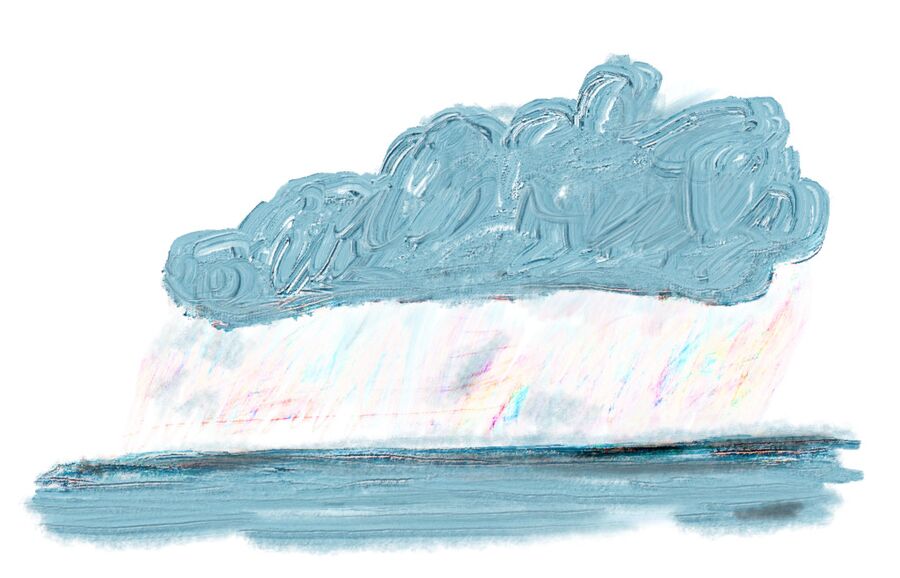
I have noticed that is possible to use RGB brushes with the Color paint dynamics parameter and solve the issue of colourizing also them. I have tested if is possible to use the Color (paint dynamics parameter) with the Clone Tool. All parameters of dynamics are linked except the Color. So, If I think that is possible to use an RGB brush with the Color Paint Dynamics parameter I think is possible to enable also this possibility to Clone Tool.
Reasons of the Improvement
With Clone Tool is possible to emulate with exceptional results the impasto and oil textures without additional resources or engines. This method is not ready-to-use but it needs some tutorials and videos to show how to use this emerging feature. The profile of this feature is indicated to high-end users and painters that are interested to use GIMP to improve their style.
The Clone Tool is very versatile and can be used easily to resolve many issues of the impasto effectively… convinces the viewer how the impasto, not only by an engine but also from the usage of this feature creatively and differently of other similar apps. I have commented, in past, on this point with many of my friends, Gustavo Deveze, Mozart Couto and Vasco Alexander. Vasco sent me interesting notes about this, which I have copied below as an excerpt:
Next, I will write down my thoughts on impasto and the simulation of real tools in digital painting. First of all, your work is of the highest quality of what I have seen so far in this field. I can't say much about the technical approach, but I think it might be of interest to discuss reasons why especially impasto is important to improve the quality of digital painting tools.Two physical aspects of (traditional) impasto came to my mind. First, it is a bridge connecting an illusory space with the real world and second, it adds real value (thick oil paint is expensive). The second aspect might be outdated, but I believe that there is still some truth in it. Additionally, there is an artistic aspect in showing the work/process of the artist through visible strokes. This might help to convince the viewer of the artistic virtuosity and the ability of abstraction. [I explicitly think of impasto here and not of creating visual meanings/textures with flat strokes]
When it comes to digital art we are facing the problems of virtuality and originality. We might not be able to solve these problems, but we might be able to create an illusion to convince our audience. Impasto is a great way to do this. To build a bridge to the real world and take a step away from the virtual aspect. It simply helps to sell our work to the viewer as something that is man-made, unique and original. This becomes even more evident if we think of highly abstract art. Of course, there are other reasons why we need to improve digital tools e.g. stylization, reproduction of traditional work etc.
With Deveze, I have made some tests with the Clone Tool and is possible to use this tool to resolve many issues about impasto and to mix partially the strokes (smudge via Color parameter on Paint Dynamics), but is not possible to use the Color parameter, that is main subject of this topic.
To emulate impasto with GIMP we can use practically all instances of 'Source' [image, pattern (clipboard or specific pattern)] and different options of 'Alignment', with a great variety of the resulting and possibilities and is very creative the process (this is a stuff for a tool presets collection and here is not place to discuss this point). So the possibilities of this usage are enormous… because we have:
{Brush (library, clipboard) + Tool Options + Paint Dynamics + Source [image, Pattern (library, clipboard)] + Alignment types (None, Aligned, Registered, Fixed)}
Only to demonstrate a bit more, for instance, the clipboard feature used many times, to select/copy different parts of an image or swatches or patterns pre-built for this scope is possible to produce something as we see in the figure at the top of this document.
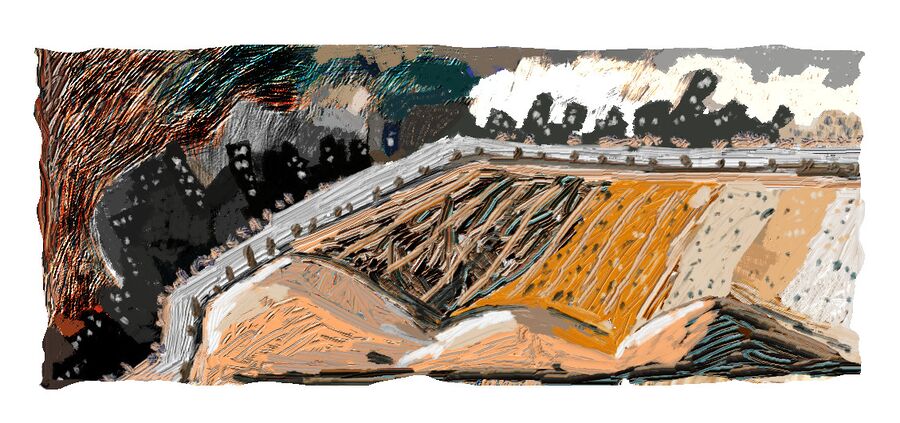
So, is possible to use this method… with personal 'pattern swatches' to have variations and other colours, as a kind of customized palette, to emulate different effects and colours.
