Animated Brush
Intoduction
A good intro to this GIMP brush type could be how tiny the documentation about and how is the hidden potential. This contradiction is usual in many topics where the misunderstanding of the importance is exchanged as such a complex thing to use. In part, this is true... but many things in digital painting have this issue. I will write some articles to add a new vision of brush type, for instance, when I've been searching the current references I found an interesting comment about the Tube Brush on PS and it seems that 'Animated Brush' on Gimp have many qualities that other tube brushes don't have... interesting investigate it too.
Some Advice for Gih Brush Design
The more important thing about building Animated brushes with more than one dimension is to imagine how they must work with stain variations. Making animated brushes with many dimensions without this study doesn't make sense because of two things mainly:
- First, is very difficult to control and organize the brushes by different dimensions and parameters,
- and second, the effect is very random to understand the effect of each aspect.
If the brush builder does not want to study the influence of different dimensions and arrays is preferable to simplify the stains and put them in a unique dimension with random behaviour. But, this does not signify that this approach is better is only a way to solve the issue with a pragmatic approach ;)
Considerations about Brush Design
I want to expand this article with some practice demonstrations between different arrays and dimensions.
I have studied different arrays and dimensions, IMO for painting skills the arrays with 3 dimensions are sufficient, but is necessary to do experiments and to use methods to comprove this thesis.
Normally linear thinking is common sense, that a static brush (parametric .vbr or a static raster .gbr) with Paint Dynamics is 'completely' able to emulate many brush skills in the digital painting. This is true if you are interested mainly in a style well-formed (for instance, a classic and not a pictorial approach) but, this approach can be thought of as limited by many artists.
I understand perfectly the approach to solving these issues with economy and efficiency: so, is necessary to investigate with patience this argument and go over the simple .gih raster of one dimension.
We have in Gimp some levels of complexity to emulate the behaviour of the brushes, normally we have:
- The own paint tool with their features and skills;
- The brush asset that amplifies the features and skills of the paint tool;
- The Paint Dynamics uses the previous possibilities as such a simple starting to go beyond and confer different complexity grades to try to emulate or mimic some of the pictorial techniques.
Well, point 2. is understandable that if the Brush is more complex will imply a different effect when we link with the Paint dynamics than a brush more simple. So, is possible that .gih brush has hidden possibilities and we must investigate it.
Two Dimensions .gih Matrix
To explain, I prefer to use an example with a matrix of two dimensions. It is interesting to imagine the aspects, as a possible change state of a pictorial stain. So, in the example that I will propose with two dimensions, the aspects of the 1st dimension modify the aspect of the 2nd dimension, in this sense, the 1st dimension, could be understood as a subtle modifier of the aspects of 2nd dimension. This example is not an exercise to emulate some effect on the brushes, but only to understand the mechanism to build it.
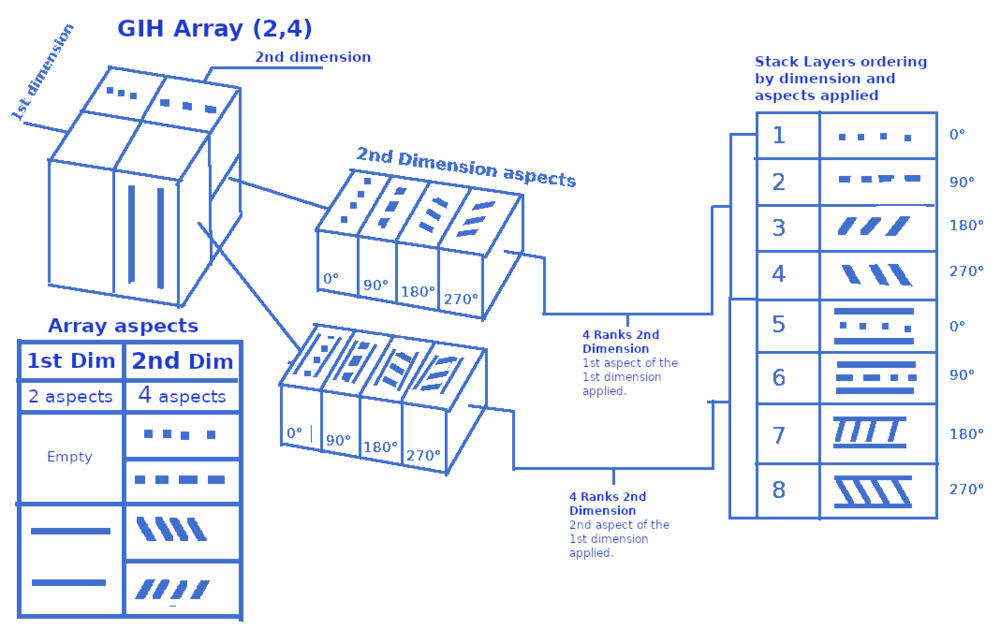
I imagined a matrix with 2 dimensions, the first dimension with 2 aspects (random) and 2nd dimension with 4 aspects (angular).
To calculate the number of necessary layers on GIMP we must multiply the ranks of two dimensions, 1st(2) x 2nd(4) = 8 layers. Is also important to explain how we can transform the aspects in the correct order on the layer stack. When we talk about aspects… we are talking about the number of variations of these aspects that could be in a brushstroke. In many cases, it is useful to sketch on paper to imagine how it works before building it.
Aspects of each dimension
The 1st dimension is formed by two random aspects (without and with up-down lines over the stains of the 2nd dimension), instead, the 2nd dimension has four aspects that follow the angular direction of my device (mice or stylus) and in this case combinations between different dash lines (hyphen and dots) and slash and backslash characters (/ and \): two dash line types (hyphen and dots) and slash and backslash characters (/ and \).
The 2nd dimension is formed for 4 aspects (Angular = 0°, 90°, 180° and 270°), each one is a different stain, so 4 images (one for each aspect):
|. . . .| | Hyphen dash line => 0°
|- - - -| | Point dash line => 90°
|/ / / /| | Slash kind line => 180°
|\ \ \ \| | Backslash kind line => 270°
Stack Layers Ordering
To make the combination of these aspects in the stack layer on GIMP is a difficult task, then is interesting to make a sketch before. My example is easier to imagine... the lines up-down (without and with) that could be printed together of 2nd dimension aspects can be exemplified so:
We need to organize the layer stack by groups where the aspects of 1st and 2nd dimensions are combined in a way to .gih array returns correctly the effect chosen in the matrix, or rather, the 1st dimension has two aspects with random parameters and the 2nd dimension has 4 aspects for the angular parameter. To know how many layers by the group we can apply this general rule:
Groups of 1st dimension = Total layers / 1st dimension aspects = Layers per group, or rather => Groups of 1st dimension = 8/2 => 4.
- We have 2 groups with 4 layers (they are the aspects of the 2nd dimension combined with the 1st dimension).
- Each group of the 1st dimension is divided by the number of aspects of the 2nd dimension, in this case, 4/4=1, then we have one layer for each angular position, in total 4.
The sequence of layers is ordered by dimensions and their aspects.
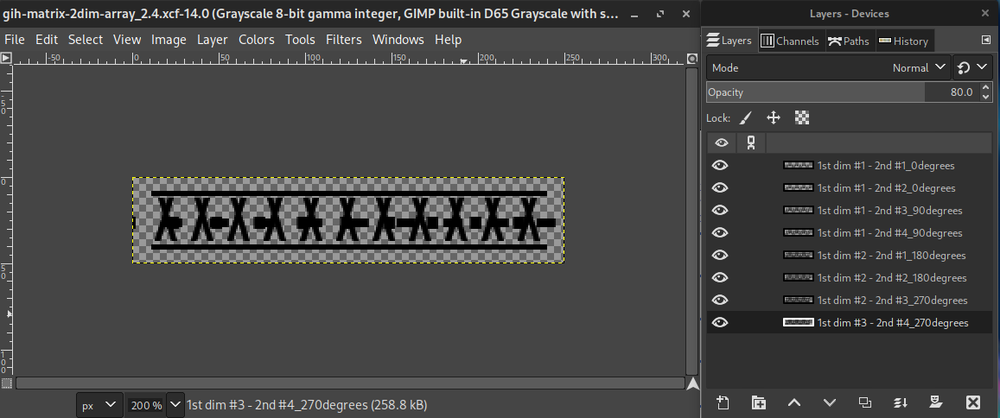
The stack layers of the first group are [1,1; 1,2; 1,3; 1,4] (the 1st aspect of the 1st dimension applied to all aspects of the 2nd dimension). The stack layers of the second group are [2,1; 2,2; 2,3; 2,4] (the 2nd aspect of the 1st dimension applied to all aspects of the 2nd dimension).
Describing how it is applied literally:
The 1st aspect of 1st dimension
- 1st layer: 1st aspect of 2nd dim (hyphen dash lines) without lines up and down → 0°
- 2nd layer: 2nd aspect of 2nd dim (dot-dash lines) without lines up and down → 90°
- 3rd layer: 3rd aspect of 2nd dim (slash lines) without lines up and down → 180°
- 4th layer: 4th aspect of 2nd dim (backslash lines) without lines up and down → 270°
The 2nd aspect 1st dimension
- 5th layer: 1st aspect of 2nd dim (hyphen dash lines) with lines up and down → 0°
- 6th layer: 2nd aspect of 2nd dim (dot-dash lines) with lines up and down → 90°
- 7th layer: 3rd aspect of 2nd dim (slash lines) with lines up and down => 180°
- 8th layer: 4th aspect of 2nd dim (backslash lines) with lines up and down → 270°
Note: The .gih array for angular behaviour on GIMP always begins with the 90° layer, in my example are the 2nd and 6th layers of the stack.
Testing the array(2,4) - Random/Angular
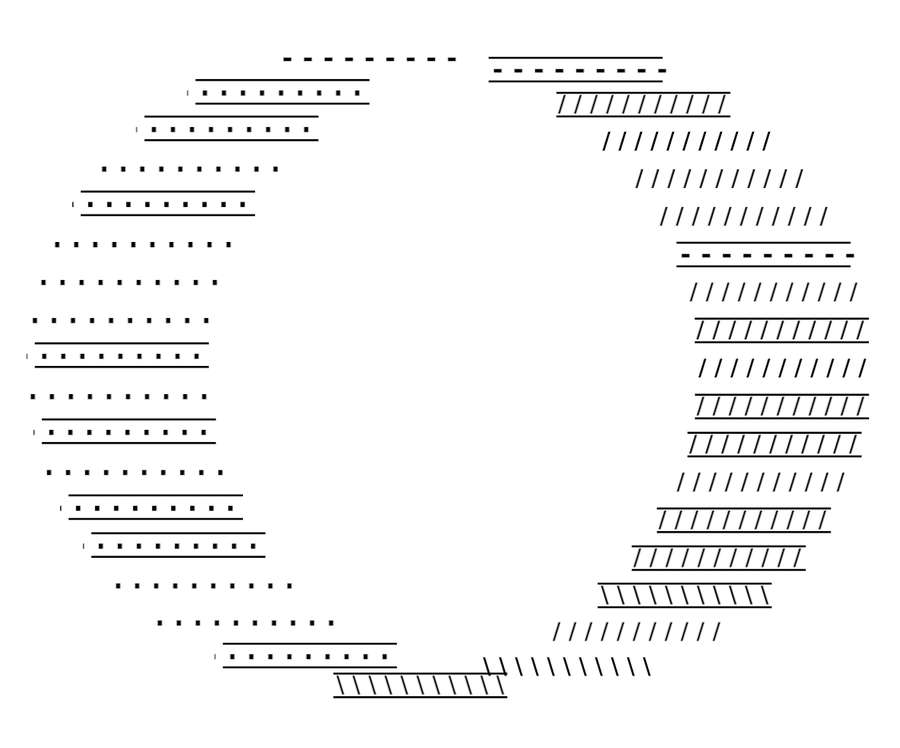
The array for the 2nd dimension, Angular, is only based on 4 aspects and isn’t very precise because of the short number of ranks, but is sufficient to print correctly the major part of the stain aspects. To apply the array I used a simple circular selection and applied the Fill Stroke Selection.
The brush is not created for drawing or painting… only to make a practical example of 2 dimensions .gih matrix, but I’ve made a sample only for fun ;)
Conclusions
I’ve been making .gih brushes since 2008 and its matrix is a thing very difficult to understand. I’ve studied this matrix many times in different periods and is always a bit complex to remember how to use it effectively on painting issues. Then I thought to write this document, to make a big picture to help ourselves and to remind that is necessary to some tutorials and practical methods to use this resource.
In past, I was a bit convinced that doesn’t have a sense of the .gih brushes with more than 1 dimension… but was personally difficult to understand how to use the .gih brushes in digital painting at that moment. Common sense is that the .gbr + paint dynamics is sufficient to emulate the main aspects of the pictorial technique on digital painting... and is in great part correct... but also the .gih has an important role in emulating the specific cases of the personal and customized style.
We can say that the .gih with more than 1 dimension is a thing very specific for refined painters and illustrators. The main reason to make a .gih brush with more than 1 dimension is related to some nuances of the stains, for example, in some brushes is interesting to have a small random noise on the brushstroke borders, but each case is a case. In general proposals, the .gbr + paint dynamics are indicated as sufficient.
References
In the revision of this article, I searched on the web about the topic and the references are fewer than some years ago.
- An excellent tutorial by Adrian Likins, that needs to improve with other samples and videos, perhaps.
- Official Documentation based on examples with decorative scopes and not applied to paint tasks. I can try to improve it, but is hard.
- Interesting thing about the PS brushes and the different approach that Gimp has with tube brushes = animated brushes.
- An old video that I made about the array, is in Portuguese but is possible to use automatic captions in English... The video is based on a drawing in progress and is easy to understand.
